
Uncategorized
Trail Running Waist Band for Gear in Australia: Choose Your Setup
Oct
What if the right trail-running carry setup is the one that holds what you need without pulling your focus from the track? Choosing a trail running waist band for gear australia runners can use starts with a practical question: how much do you need to carry, and how securely will it sit as the terrain changes?
It’s easy to feel caught between a compact belt that may not fit your full kit and a vest or pack that carries more than your run requires. The right choice depends on your route, duration, hydration needs and any race-day mandatory gear. This guide will help you match your setup to the effort, assess storage, fit and access before buying, and compare a waist belt with a vest or pack. You’ll also find a relevant option from Fastgear Australia: the Compressport Free Belt Pro. Build your carry plan around the load, movement and access you need, then head out ready to focus on the trail.
Trail Running Waist Band for Gear Australia: Key Takeaways
- Choose a trail running waist band for gear australia runners can match to their route by separating essentials, such as a phone and fuel, from optional items.
- Consider pocket layout and how you distribute your load to keep key items organised and accessible on the move.
- Compare a waist belt with a vest or pack based on the gear you need to carry, your run and your hydration setup.
- Test your loaded belt while moving and wearing the clothing planned for your outing. Adjust anything that shifts or is hard to reach.
- Use your load, movement and access needs to assess Fastgear’s Compressport Free Belt Pro.
What should a trail running waist band carry on Australian trails?
A trail running waist band carries selected essentials around your waist while you run. The aim isn’t to squeeze every possible item into one place. Start with the gear your outing calls for, then choose a carry format that holds it securely and keeps key items accessible. A useful first step is to separate what you must carry from what would merely be convenient.
Your route, duration, weather, event requirements and personal needs all shape that list. A familiar short run near support may call for a different load from a remote outing or a race with mandatory gear. Check the organiser’s requirements for an event, and plan for the conditions and access to water on your route. There’s no universal checklist for every runner or trail.
Which essentials belong in a trail running waist band?
Write down the non-negotiables first. Depending on the outing, these might include your phone, keys, race bib and planned fuel. Then consider optional items, such as sun protection or a light layer, based on conditions and personal preference. The trail running overview describes common carry options such as hydration packs and waist packs, but your own load still depends on the route.
- Core load: Items you need for access, identification or your planned fuelling strategy.
- Extras: Useful additions that depend on weather, distance, remoteness or individual needs.
Check whether the essentials fit without forcing the belt closed or making important items difficult to reach. If the route or event calls for more gear than the belt can carry, don’t leave necessary items behind to keep your setup minimal. Reconsider the carry format instead.
When is a waist belt a better starting point than a pack?
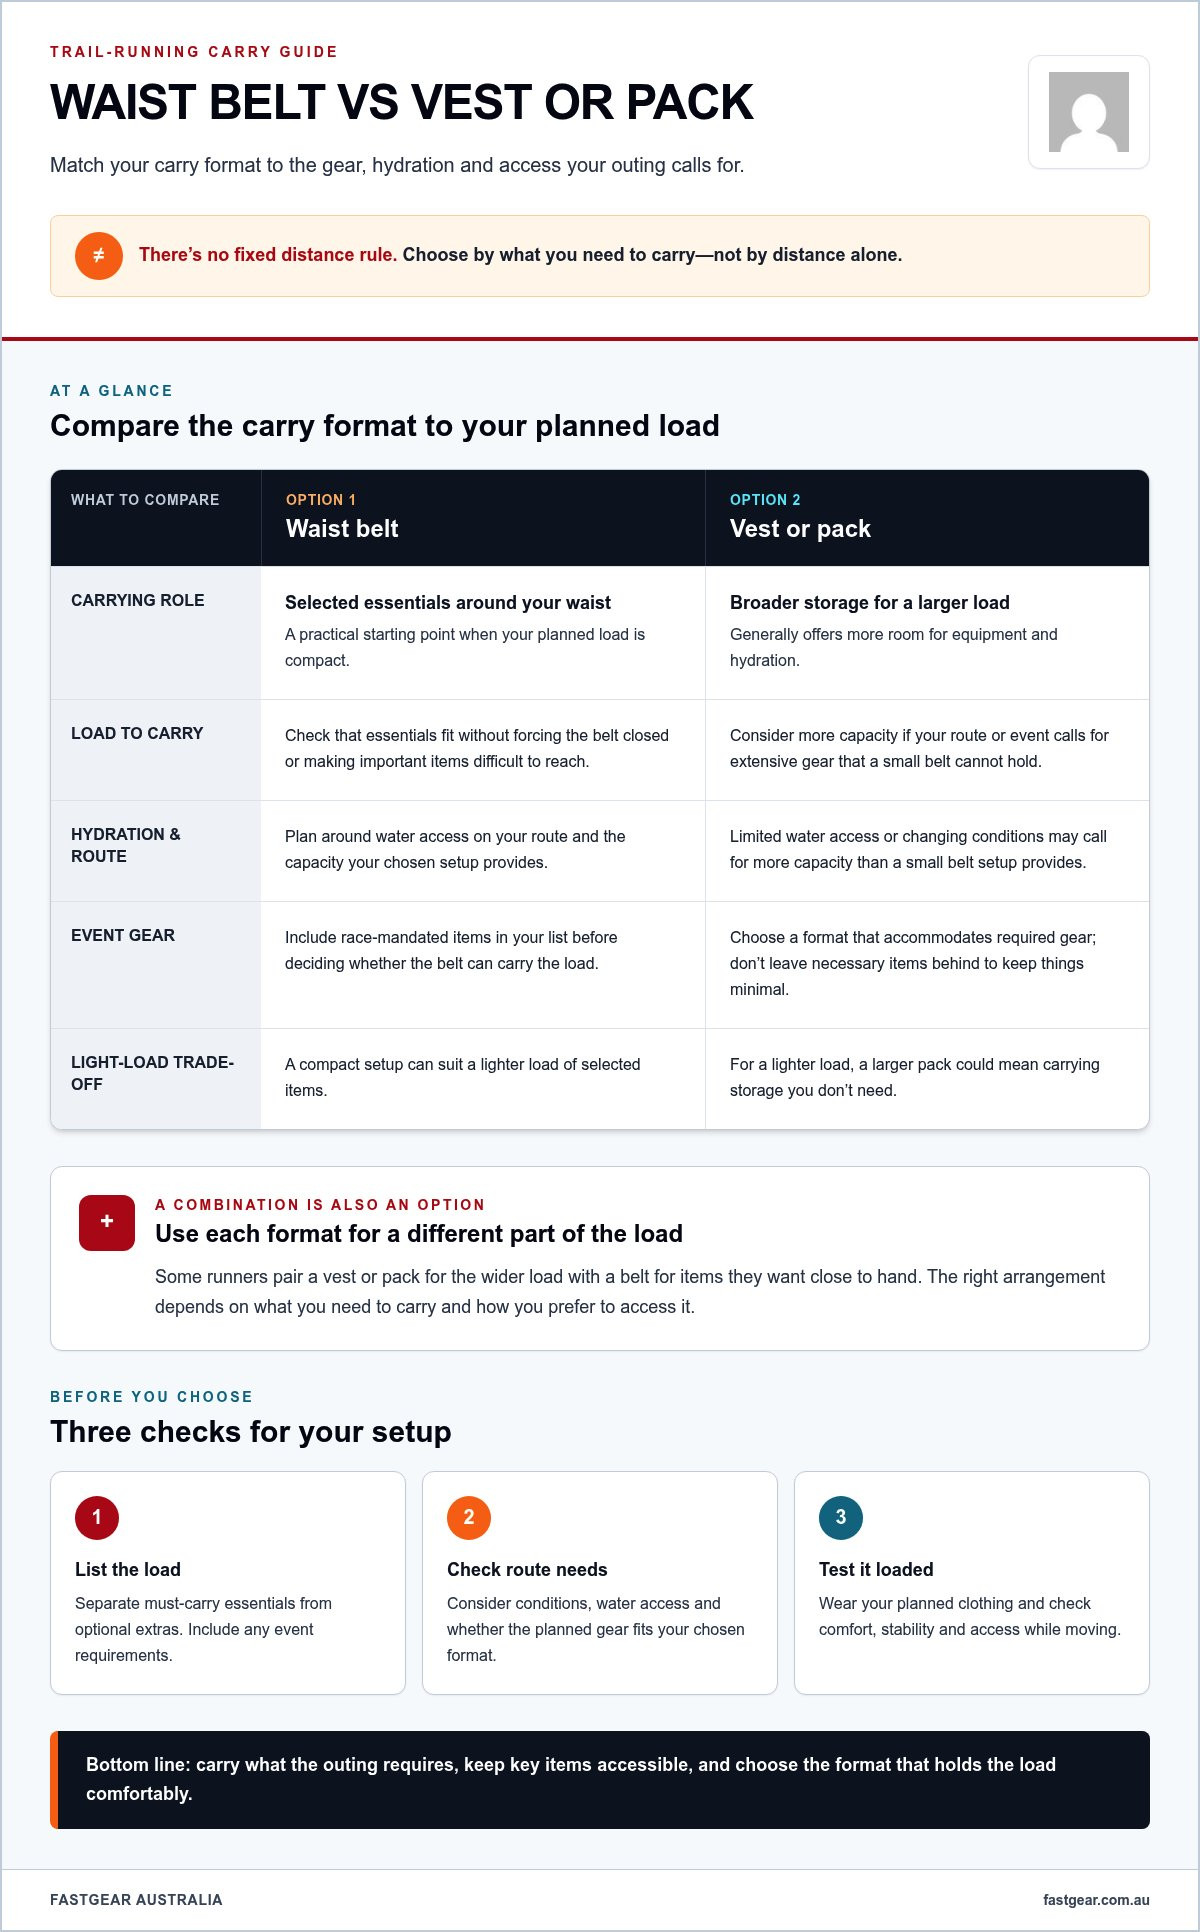
A belt can be a practical starting point when your planned load is compact and you want to carry selected items around your waist. A vest or pack generally offers broader storage for a larger equipment load and hydration. Choose between them based on what you need to carry, not a fixed rule about distance.
A route with limited access to water, changing conditions or extensive event gear may call for more capacity than a small belt setup provides. For a lighter load, a larger pack could mean carrying storage you don’t need. List the required items, including any race-mandated gear, then see which format accommodates them while keeping essentials accessible.
Some runners may also combine formats: a vest or pack for the wider load, with a belt for items they want close to hand. The right arrangement depends on what you need to carry and how you prefer to access it. No single option suits every trail, race or runner.
How trail running waist bands carry gear while you move
A belt’s construction shapes how it sits on your waist, while its pocket layout determines where items go and how you reach them. Think beyond total storage: a pocket that holds an item securely but makes it awkward to retrieve may not suit something you need during a run. Before buying, consider which items you’ll access on the move and which can stay tucked away.
Fit matters once you’re moving over uneven ground. A belt that feels comfortable while standing may feel different when you run, climb or bend. Check whether the loaded setup shifts, rubs or presses in a way that distracts you. Your body, clothing, load and running style all affect how a setup feels.
Belt performance comes down to fit, load and access working together. Keep that principle in mind as you compare construction and test where each item sits.
Tube-style and adjustable belts: what is the difference?
A tube-style belt is a continuous band of fabric with storage integrated into its body. An adjustable belt uses a fastening or adjustment system to alter how it sits around the waist. These broad design descriptions help frame what to inspect, but neither type is automatically the better choice.
Assess how each design fits over your planned running clothes, whether the storage suits your essentials, and how easily you can reach them. Check that the belt feels secure without excessive pressure. If you’ll carry several items, consider whether the layout lets you separate them rather than bunching everything together in one spot.
How does load placement affect access on the trail?
Where you place items affects how quickly you can retrieve them and how the load feels as you move. Put frequently accessed items where you can reach them without twisting or slowing down. Less-used essentials can sit in a position that’s still secure but doesn’t compete for quick access. Try to spread items around the waist rather than concentrating the full load on one side. Balanced placement can help keep your kit organised and reduce a lopsided feel, though it can’t guarantee that a belt won’t move.
Test the arrangement in the clothing you plan to run in. A jacket waistband or thicker layers can change how the belt sits and how easily you can reach a pocket. Practise retrieving fuel or checking your phone while walking, then while jogging in a safe place. Notice any rubbing, shifting or awkward movement. Adjust the position or redistribute the contents, then test again.
- Check access: Can you reach the item you need without stopping or fumbling?
- Check stability: Does the load stay comfortable as you change pace or direction?
- Check separation: Are small items such as keys kept apart from anything they could scratch or snag?
Use fit, load and access to assess any trail running waist band for gear australia runners are considering. Once you’ve set your criteria, explore Fastgear’s Compressport Free Belt Pro as an option for your setup.
How to compare a trail running waist band with a vest or pack
Compare carry formats against your actual gear list, not a general idea of what trail runners “should” wear. A belt, vest or pack can each suit a different setup, and the right choice depends on what the outing requires. Use this table as a buying framework for comparing roles and fit checks, not as a technical specification comparison of particular products.
| Decision point | Waist belt | Vest | Pack |
|---|---|---|---|
| Load size | Consider it for a compact selection of essentials. | Consider it if your list needs broader storage. | Consider it when your planned load needs a larger carry format. |
| Access | Check that key items are reachable from their positions. | Assess whether the layout suits the items you need close to hand. | Check that essentials aren’t buried beneath less-used gear. |
| Fit check | Test for comfortable placement and shifting as you move. | Check how it sits with your running kit and loaded contents. | Assess comfort and access with the full intended load. |
| Intended run | May suit an outing with a limited gear list. | May suit a run requiring more varied equipment. | May suit a route or plan that calls for a broader load. |
When does a waist belt suit the gear you plan to carry?
Picture a run where your personal load is limited to a phone, keys and planned fuel. A belt may suit that setup if each item fits securely and you can reach what you need without interrupting your stride. But the example isn’t a rule: clothing, route conditions and individual requirements can change what you need. If you’re planning fuel, this endurance sports nutrition guide offers broader fuelling context.
When might a vest or pack suit your setup better?
If your list includes several different types of gear, such as extra clothing alongside essentials, a vest or pack may provide a more suitable format. Don’t assume the larger option is automatically more comfortable, or that a belt can’t work for a particular trail. Match the format to the complete load and how you want to access it.
To make the comparison practical, lay out everything you intend to carry, including any items required for your event or planned conditions. Load each format you’re considering, put on your running clothes and move through the motions of your outing: jog, bend, reach and change direction. Check what shifts, feels restrictive or is awkward to retrieve. Adjust the placement and test again. This turns “Which has more storage?” into a more useful question: “Which setup carries my gear in a way that works for this run?”
For a trail running waist band for gear australia runners are assessing, use the same criteria each time: load, access, fit and intended use. A clear comparison helps you avoid carrying unnecessary bulk while keeping the gear your outing calls for within reach.
How to check fit and prepare your trail running belt setup
A belt can feel different once it’s loaded and you’re moving. Test the complete setup before heading onto the trail, using the clothing and items planned for that outing. This practical check helps you spot rubbing, shifting or difficult access while you can still reassess the arrangement.
- Choose the run. Identify the route, expected duration and conditions. Note any event gear requirements and personal needs that affect what you’ll carry.
- List the gear. Write down the items you plan to take, including fuel and anything you’ll need to reach quickly. Separate essentials from optional extras so the load reflects this specific outing.
- Load the belt. Place each item where you expect it to sit during the run. Check that the contents fit without forcing them into a pocket or making important items awkward to reach.
- Move in your intended kit. Wear the clothes you plan to run in. Check the belt while standing, walking and jogging, paying attention to comfort, rubbing and whether the load shifts.
- Reassess access. Practise reaching the items you expect to use. If comfort or access changes as you move, adjust the load or its placement and repeat the check.
What should you test before taking a loaded belt on a trail?
Test the belt with its full planned load, not just when empty. Notice whether it stays comfortable through ordinary movement and whether each item remains organised. Check that you can retrieve the items you expect to use without an awkward reach. A setup that feels fine while standing may feel different when jogging, so assess it through each stage.
If something rubs, shifts or is hard to reach, treat that as useful feedback. Reposition or reduce the load if appropriate, then run through the checks again. The aim is to see how the setup works for you, not to assume a particular result.
How should trail conditions affect your carried gear?
Let the route, duration and expected weather shape your gear list, alongside your own requirements. A familiar outing in settled conditions may call for different items from a longer route or a day with changeable weather. For a race, use the organiser’s instructions to plan any required equipment. There’s no single checklist that fits every Australian trail or runner.
Hot conditions can also influence how you plan fuel, though that’s separate from belt fit. For further context on that topic, see this hot-weather ultramarathon fuelling guide.
Use the same fit process when assessing a trail running waist band for gear australia runners might choose: load it for your outing, test movement and check access. Ready to explore a specific option? Explore the Compressport Free Belt Pro at Fastgear.
Explore Fastgear’s Compressport Free Belt Pro for trail gear
You’ve now got a practical way to assess your carry setup: start with your gear list, decide which format suits it, then consider fit and access with the load in place. Fastgear Australia sells the Compressport Free Belt Pro as part of its range of performance gear. Use the same criteria you’ve applied throughout this guide rather than assuming a product will suit every runner or outing.
How to use your selection criteria when browsing Fastgear Australia
Before you browse, revisit your planned run and write down the items you expect to carry. Think about which you need to reach during the effort and which can stay packed away. Then compare your intended carry format with those needs. Fastgear Australia’s online range includes endurance sports nutrition and performance gear, giving Australian runners a place to explore relevant gear options.
Keep the product assessment focused on what matters to you: your load, movement and access. Use your own gear list as the reference point for deciding whether the Compressport Free Belt Pro merits a closer look. The product listing can inform your choice, but it doesn’t replace a loaded fit check.
- Load: Does your planned kit suit a waist belt, or do you need another format?
- Movement: Can you wear the setup comfortably with your intended running clothes?
- Access: Can you reach the items you expect to use without fumbling?
- Outing: Does your gear plan reflect the route, conditions and any event instructions?
What is the next step after choosing a waist belt?
Test the belt with the actual items and clothing you plan to use before a key run or race. Move through the same motions you’ll make on the trail and notice whether the loaded setup shifts, rubs or makes essentials difficult to reach. If your experience changes as you move, reassess the arrangement and repeat the test. That’s a practical check, not a guarantee of how the belt will feel on every outing.
Keep fuelling decisions distinct from the belt decision. Your planned fuel may be part of the load, but your nutrition strategy depends on separate considerations, including the outing and your own requirements. First decide what you need to carry, then assess how the belt works with those items.
If you’re looking for a trail running waist band for gear australia runners can assess against their own criteria, start with your planned load and fit check. Explore the Compressport Free Belt Pro at Fastgear Australia and consider how it fits your trail setup.
Build a carry setup you can refine
Use your next outing to establish a personal gear baseline. After the run, note what you carried, what you reached for and whether anything felt awkward in motion. Keep that record as a reference, not a fixed checklist. A change in route, weather or run plan may call for a different load, so adjust deliberately rather than adding extras by habit.
If you’re considering a trail running waist band for gear australia runners can use, weigh the option against what you’ve learned from your own outings. Fastgear is an Australian online retailer of endurance sports nutrition and performance gear, and the Compressport Free Belt Pro is part of its range. Explore it with your own needs in mind, then assess your chosen setup with your planned kit before relying on it for a key run.
Explore the Compressport Free Belt Pro at Fastgear, and take your next trail run one step closer to a dialled-in setup.
Frequently Asked Questions
Is a waist belt suitable for trail running?
Yes, a waist belt can suit trail running if it carries the items your outing requires and feels comfortable as you move. For a short loop close to support, a compact setup may be enough; a remote route or changeable conditions could call for more gear. Try the loaded belt on similar terrain before relying on it for a longer run, and plan around your own needs.
Can a trail running waist band carry a phone and keys?
It can, provided the belt’s storage can accommodate both items securely. Test the loaded setup rather than assuming they’ll stay in place: jog, bend and reach, then check whether the phone is accessible and the keys are contained. Keep keys positioned so they don’t scratch your phone or press uncomfortably against you. If either item shifts or is hard to retrieve, reassess the arrangement.
How do I stop a running belt from bouncing?
You can’t assume any belt will stay completely still, but a fit check may help you identify what’s causing movement. Make sure the belt sits comfortably, remove items you don’t need and avoid concentrating the load in one spot. Test it while jogging and changing direction. If it still shifts or rubs, adjust its position or contents and repeat the check before taking it on a trail.
Can I wear a running waist belt over a jacket?
Possibly, but the jacket’s fabric and fit can change how the belt sits. Try the belt over the actual layer you plan to wear, then walk and jog to see whether the fabric bunches, rubs or allows the belt to shift. Check that you can still reach the items you need. Repeat the test with other planned layers if conditions may change during your outing.
What should I check before using a belt in a trail race?
Read the race organiser’s current mandatory gear list and make sure your complete setup accommodates every required item. Requirements can differ between events and may reflect the course or conditions. Don’t assume a belt alone will carry everything simply because it holds your personal essentials. Load it with the planned race kit, check that items are accessible, and use another carry format if the full list needs more room.
How do I clean a running waist belt?
Follow the care instructions provided for the belt, as cleaning methods can vary by material and construction. First remove its contents and shake out loose grit. Check the label before using soap, soaking the belt or putting it in a washing machine, and follow any drying guidance. If you can’t find care instructions, avoid assuming a particular cleaning method is suitable for that product.
Can a waist belt replace a running vest for an ultramarathon?
Not automatically. An ultramarathon’s required gear, hydration plan, route and conditions may call for more carrying capacity than a belt provides. Check the event’s mandatory equipment list and map your full load before choosing. Some runners may use a belt alongside a vest for access to selected items, while others may choose a different setup. The key is carrying the required kit in a format that works for you.
