
Uncategorized
Choosing a road bike saddle for pressure relief: fit, padding and shape
Oct
More padding isn’t always the route to a more comfortable road ride. A practical starting point for ergonomic road bike saddle pressure relief is saddle width: choose a width equal to your sit-bone width plus 2cm. Then assess how the saddle’s shape supports you in your riding position.
It’s easy to assume a softer, thicker saddle will feel better over distance. But extra padding can create pressure points on longer rides, while the wrong width or shape may leave pressure where you want relief. Comfort comes from matching the saddle to your body and riding position, not simply adding cushioning.
This guide breaks down how to measure sit-bone width and compare saddle widths, nose lengths, cut-outs and relief channels. You’ll also learn what gel padding and 3D-printed tops can change, and why your handlebar height matters when assessing pressure. Use the comparisons and decision guide to narrow your options, then consider how each saddle feels on the road. The goal is a stable, supportive fit that lets you focus on your ride.
Key Takeaways
- Set saddle position around a stable, supported riding posture; small adjustments can change where pressure builds.
- Compare saddle shapes against your sit-bone support and riding position, not width alone.
- Use cut-outs and relief channels to reduce contact in targeted areas, while checking that the surrounding shape still supports you.
- Choose padding for support over distance, not softness at first contact; excess cushioning can create pressure points on longer rides.
- Assess pressure alongside your handlebar height and torso angle, as your riding position affects how your weight rests on the saddle.
How do I choose the best road bike saddle for me?
Start with support, riding position and intended distance, then compare saddle shapes and materials. A saddle that feels soft in the shop may feel different after sustained time on the bike.
Performance and comfort saddles
Performance-focused saddles typically have a firmer, streamlined profile to support an aerodynamic riding posture. Comfort-focused options often have more padding and a broader contact area. Neither category guarantees a better fit: your sit-bone support, flexibility and position determine how each shape feels. Compare carbon-shell designs by their support and flex, not by material name alone.
Padding for longer rides
Extra padding can feel comfortable at first, but too much may compress under load and create pressure points on longer rides. A firmer surface can provide more consistent support when your position stays stable. Judge padding during a ride, not just by pressing it with your hand. Note whether pressure builds, you shift repeatedly, or you change posture to avoid discomfort.
Saddle adjustment for comfort
Adjust one factor at a time so you can identify what improves your comfort. Begin with saddle height, then review fore-aft position and tilt while pedalling in your usual riding posture. A saddle set too high can make your hips rock; an unsuitable tilt can encourage sliding or excess hand pressure. Mark the starting position, make a small adjustment, then ride the same route and compare how your pelvis feels.
Length can help narrow the shape. The UCI minimum saddle length is 240mm. Traditional saddles are around 270mm and above. Saddles shorter than 260mm are considered short-nose, while saddles longer than 260mm are considered long-nose.
| Option | Profile | Best comparison point |
|---|---|---|
| Performance-focused | Firmer, streamlined | Support in an aerodynamic position |
| Comfort-focused | Often more padded | Pressure over longer rides |
| Short-nose | Shorter than 260mm | Room to rotate forward |
| Long-nose | Longer than 260mm | Support across a longer profile |
Choose a profile that supports your sit bones and keeps your posture stable during your usual ride.
Testing and breaking in a saddle
Test a new saddle in your usual riding kit and position, starting with a familiar, shorter route before extending the ride. Pay attention to pressure, numbness, sliding and whether you keep repositioning. Change only one setting between rides, and record what you changed and how it felt. Saddles need not feel painful while “breaking in”; distinguish discomfort caused by fit from unfamiliar firmness.
Australian bike-fitting services can assess saddle position and riding posture, and some retailers or fit studios offer saddle demos. Ask about the trial conditions before riding a demo saddle. For riders seeking further guidance on bicycle setup and component adjustments, cycling specialists such as Pedalinx Bike Shop share helpful advice and maintenance insights. A controlled comparison makes it easier to judge fit than changing several settings at once.
Saddle width and sit-bone measurement
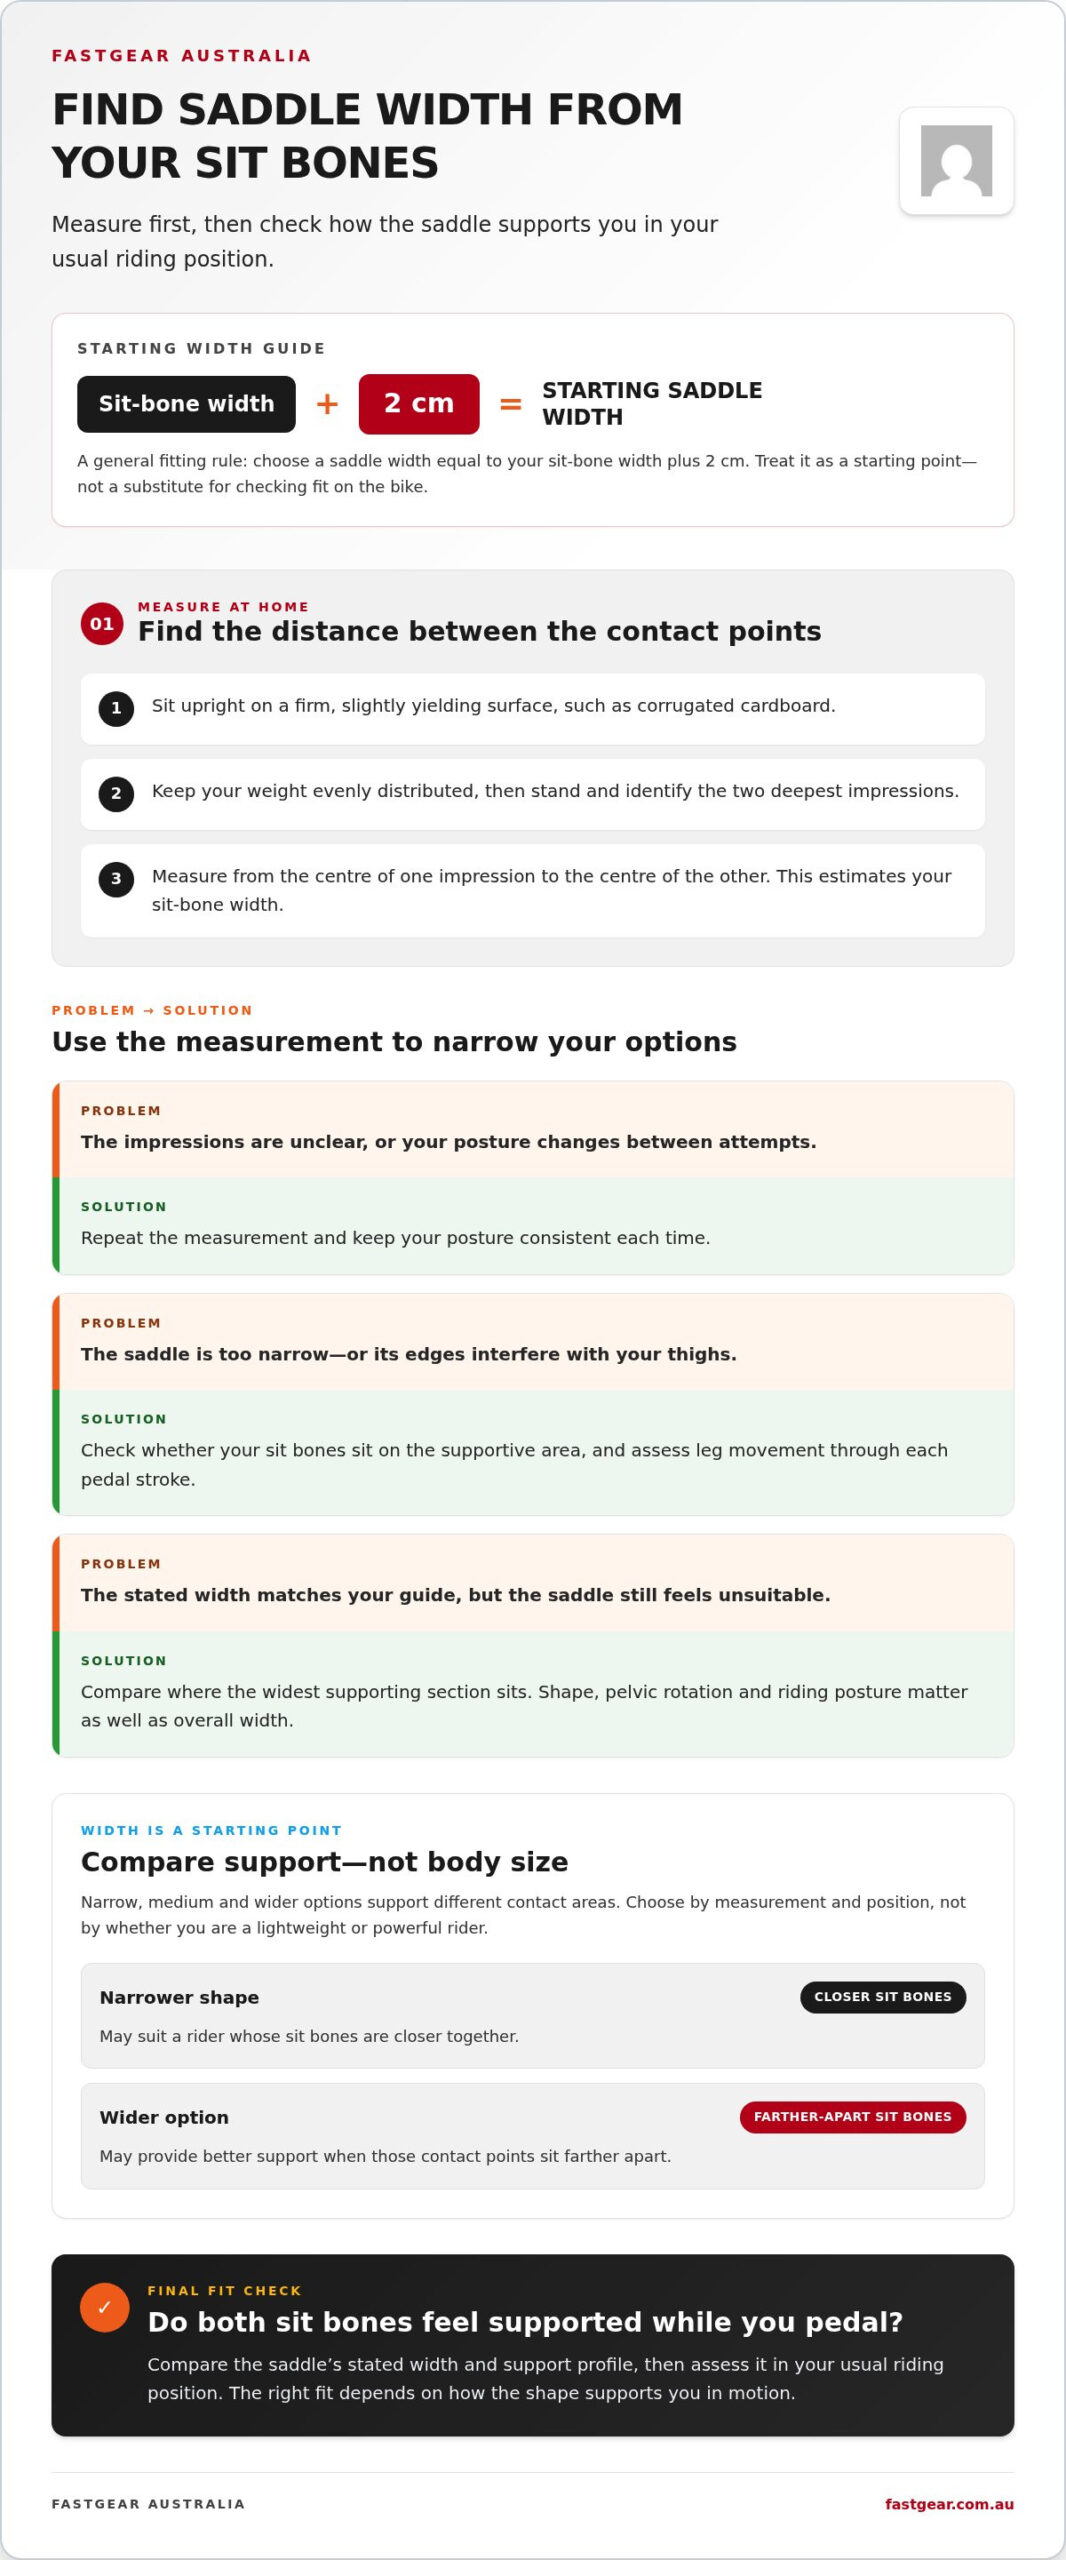
Saddle width should support your sit bones in your usual riding position, rather than simply match your body size. Measure the distance between the sit-bone contact points, then use it to compare saddle widths and shapes.
Sit-bone measurement and saddle fit
To measure at home, sit upright on a firm, slightly yielding surface, such as corrugated cardboard. Keep your weight evenly distributed, then stand and identify the two deepest impressions. Measure between their centres to estimate sit-bone width. Repeat if the impressions are unclear, keeping your posture consistent each time.
A general fitting rule is to choose a saddle width equal to your sit-bone width plus 2cm. That added width allows the saddle’s supporting area to sit beneath the contact points. For example, apply the rule to your own measurement, then compare the result with each saddle’s stated width. Treat it as a starting point, not a substitute for checking the saddle in your riding position.
Saddle width options
Narrow, medium and wider saddle options distribute support across different contact areas. A narrow shape may suit a rider whose sit bones are closer together, while a wider option may provide better support when those points sit farther apart. The right choice depends on measurement and position, not on whether you’re a lightweight or powerful rider.
Manufacturers don’t always use the same width increments or shape profiles. Compare each model’s actual measurement, then check where its widest supporting section sits. A saddle can have the right overall width but still feel unsuitable if its shape doesn’t match your pelvic rotation or riding posture.
- Measure: Find the centre-to-centre distance between the sit-bone impressions.
- Calculate: Add 2cm as a general width-selection guide.
- Compare: Match that result to the saddle’s stated width and support profile.
- Assess: Check that both sit bones feel supported while you pedal in your usual position.
Width also affects how your weight is carried. If the saddle is too narrow, your sit bones may sit beyond its supportive area. If it’s too wide, the edges may interfere with your thighs as they move through each pedal stroke. Assess contact points and leg movement together, rather than judging fit by width alone.
Use your measurement to narrow the options, then compare how each shape supports you in motion. For a saddle-related option to consider alongside your measurements, explore the road saddle range.
Why do some bike saddles have cut-outs and relief channels?
Cut-outs and relief channels change where a saddle contacts your body. They’re designed to reduce contact through the centre while keeping support beneath the sit bones.
An ergonomic saddle can relieve perineal pressure by shifting some support towards the sit bones and away from sensitive central tissue. A cut-out creates an open area; a channel forms a recessed path through the saddle’s surface.
A cut-out removes material from the saddle’s centre, while a relief channel leaves the cover intact but lowers its profile. Both designs aim to reduce direct contact in a targeted area. The right option depends on your anatomy, saddle width and forward riding position. A large opening isn’t automatically better if its edges create new pressure.
Check how the cut-out aligns with your body while riding, not just while standing over the bike. Sit in your normal position, settle onto the saddle and pedal steadily. If the opening sits too far forward or back, it may miss the area you want to relieve. The saddle’s shape must still support your sit bones through each pedal stroke.
Use these checks during a test ride:
- Notice whether the channel or opening sits beneath the area experiencing pressure.
- Check for rubbing along the cut-out edges as your legs move.
- Assess whether your sit bones remain supported when you lean forward.
- Compare the same route and riding position across different saddle shapes.
Cycling shorts and a correctly positioned chamois add a protective layer between your body and the saddle. The chamois can cushion contact and reduce skin friction during repeated pedal strokes. Wear shorts without folds, and position the pad so it stays aligned as you ride. A thicker chamois won’t correct a saddle that puts pressure in the wrong place.
Pressure relief also depends on your overall riding position. A saddle that feels comfortable upright may feel different when you rotate forward onto the drops. Check the contact area in each position you regularly use, including a steady road pace and a more aggressive effort. If numbness develops, stop riding and reassess your fit rather than pushing through it.
Surface and ride duration matter, too. A gravel ride can involve more movement and vibration than smooth road riding, changing how you settle on the saddle. Choose a shape that keeps you stable without forcing you to shift repeatedly. Cut-outs and channels are design features, not substitutes for suitable width, correct adjustment or a comfortable riding posture.
Gel padding and pressure points
Gel padding can feel soft under hand pressure, but cycling loads it differently. As you pedal, your weight settles onto the saddle through a smaller contact area. Gel may cushion that contact, but its response depends on thickness, placement and how firmly the saddle supports your pelvis. Judge the whole saddle, not the gel layer alone.
A pressure point forms where contact is concentrated. For example, if the saddle’s central area presses against sensitive tissue, adding gel across the whole top may not relieve that local pressure. It can also compress beneath your sit bones, changing how steadily they’re supported. Compare the padded surface with the saddle’s underlying shape and note where your body makes contact.
More padding isn’t automatically better for longer rides. A thick gel layer may feel plush during a brief shop test, then compress as you maintain one riding position. That change can make the saddle feel less supportive or encourage repeated repositioning. A firmer saddle may feel less soft at first, but its support can stay more consistent under sustained load.
Use a controlled ride to assess the difference. Wear your usual cycling shorts, set the saddle position, and ride a familiar route. Notice whether discomfort develops in one area, spreads across the contact points, or changes when you move onto the drops. Keep the route and riding posture consistent when comparing padded and firmer saddles.
- Check the contact: Note whether your sit bones feel supported or sink into the padding.
- Track pressure: Identify the precise area that becomes uncomfortable instead of rating softness generally.
- Compare steadily: Test one saddle at a time with the same shorts and riding position.
- Review the surface: Look for folds in your shorts or chamois that could create extra friction.
Padding and fit work together. If the saddle is too wide, its edges may interfere with thigh movement; if it’s too narrow, your sit bones may miss the supporting area. Gel cannot correct either mismatch. Check width, shape and position before treating extra cushioning as the solution.
Use your ride notes to separate cushioning from fit. If pressure stays in the same place across different padding levels, focus on saddle shape and position. If a firmer surface feels more stable, compare it on your regular ride before deciding. Comfort comes from the contact points working together, not from maximum softness.
Road saddle pressure relief
Pressure relief depends on how your saddle, riding position and anatomy work together. Compare support under load, not just product features.
Pressure-relief models by weight, comfort and durability
Cut-outs and relief channels reduce contact through the saddle’s centre, while 3D-printed tops can improve pressure distribution and air circulation. Compare these designs by how they support your position, not by the feature alone. Weight depends on the saddle’s construction and materials; comfort depends on fit and contact. Durability relates to the shell, rails and surface exposed to regular riding.
In Australia, look for pressure-relief saddles with a channel, cut-out or 3D-printed top, then compare construction and fit. Prices vary with materials and design, so assess the saddle’s support and durability alongside its cost rather than choosing on price alone.
Saddle discomfort and medical advice
Genital numbness or pain can occur when saddle contact concentrates pressure on sensitive tissue. Saddle shape, width, position and a forward-leaning posture can all affect where your weight rests. Stop riding if numbness or pain develops, then review your fit and position. Seek medical advice if symptoms persist after the ride, recur, or concern you.
Handlebar height can influence pressure, too. Women riding with handlebars lower than the seat had a 3.47 kPA increase in mean perineal saddle pressure compared with women whose handlebars were level with the saddle, according to the National Center for Biotechnology Information. This finding highlights why riders should assess saddle comfort in their actual riding position, not only while sitting upright.
Use a structured comparison instead of changing several variables at once:
- Position: Assess pressure on the tops and drops, using your usual riding posture.
- Support: Check whether your sit bones remain supported as you lean forward.
- Surface: Compare channels, cut-outs and 3D-printed tops for contact and airflow.
- Construction: Balance weight against the materials and durability required for regular riding.
Start with a familiar route and keep your shorts, saddle height and riding position consistent. Record where pressure builds and whether it changes when you sit more upright. That comparison helps separate a saddle design issue from a position change. A 3D-printed surface may distribute pressure differently, but it still needs to match your anatomy and fit.
For your next comparison, explore pressure-relief saddle options and assess each design against your position, support and riding needs.
Custom-printed saddles can use pressure mapping to help address pressure asymmetries in a rider’s position. This may offer another way to assess how support feels when you ride in your usual posture. Treat the result as a fit aid, not a substitute for checking comfort on the bike. The goal is to find support that feels balanced and stays comfortable during your regular ride.
Fastgear Australia: Compressport Trail Racing SS Tshirt
Fastgear Australia offers the Compressport Trail Racing SS Tshirt for athletes building their endurance kit alongside a considered saddle setup. Clothing won’t correct saddle pressure, so prioritise fit, position and support when choosing your road saddle. Choose performance apparel when preparing your kit for training or race-day efforts.
For longer sessions, Fastgear Australia also stocks GU Energy Gel – Single and Clif – BLOKS Energy Chews. These sit alongside the Compressport Free Belt Pro in its endurance range. Choose equipment that suits your ride, while keeping saddle comfort decisions focused on your measurements and riding position.
Visit Fastgear Australia online to explore its endurance gear.
Make your next ride a useful test
A saddle decision is more useful when it’s based on repeatable rides, not a quick impression. For ergonomic road bike saddle pressure relief, set a clear goal for your next ride: notice whether you can hold your normal position without frequent shifting or distraction. Make a brief note afterwards, so your next equipment decision reflects how you actually ride.
Build comfort into your broader preparation, too. The right saddle supports your riding; apparel and fuelling help you prepare for the demands of the session. Fastgear Australia offers the Wove M8 Road / Tri Saddle, alongside endurance gear such as the Compressport Trail Racing SS Tshirt, GU Energy Gel – Single and Compressport Free Belt Pro.
Ready to explore the saddle option? View the Wove M8 Road / Tri Saddle at Fastgear Australia, then take your next ride with a clear assessment in mind. Stay focused, make deliberate choices and keep building towards stronger days on the bike.
Frequently Asked Questions
How to measure sit bones for a road bike saddle in Australia?
Measure the distance between your sit-bone contact points at home, or have a bike fitter take the measurement during a fit. For a practical home check, place corrugated cardboard on a firm chair and sit upright with your weight evenly distributed. Compare the centres of the impressions. A practical approach to ergonomic road bike saddle pressure relief starts with using this measurement to narrow your options, then checking support in your riding position.
What saddle width and shape suit different riding positions and body types?
Choose width based on your sit-bone measurement, then match the shape to your riding position. An upright posture and a forward, low position can change how your pelvis contacts the saddle. Body weight alone doesn’t determine the right width. Two riders with similar builds may prefer different profiles if one rotates their pelvis forward. For ergonomic road bike saddle pressure relief, assess support and leg clearance in your usual posture.
Are cutout or short-nose road bike saddles better for pressure relief?
Neither design is automatically better; each changes a different part of the saddle’s contact and support. A cut-out or channel reduces contact through the centre, while a short-nose profile changes the saddle’s overall length. Riders who rotate forward may prefer a shorter profile, but anatomy and fit still matter. Compare how the saddle supports you in your regular position, and note any rubbing or pressure near its edges.
How to set saddle height, tilt and fore-aft position to reduce pressure?
Adjust one setting at a time, then ride in your normal position to identify its effect. If your hips rock at the bottom of each pedal stroke, reassess saddle height. Sliding forwards can point to an unsuitable tilt, while reaching or excess hand pressure may signal a fore-aft or position issue. Record each change and return to the previous setting if comfort or pedalling control worsens.
